Enable Crew Studio ↗
noOriginal Documentation
Documentation Index#
Fetch the complete documentation index at: https://docs.crewai.com/llms.txt Use this file to discover all available pages before exploring further.
Enabling Crew Studio on CrewAI AMP
Crew Studio is a powerful no-code/low-code tool that allows you to quickly scaffold or build Crews through a conversational interface.
What is Crew Studio?#
Crew Studio is an innovative way to create AI agent crews without writing code.
With Crew Studio, you can:
- Chat with the Crew Assistant to describe your problem
- Automatically generate agents and tasks
- Select appropriate tools
- Configure necessary inputs
- Generate downloadable code for customization
- Deploy directly to the CrewAI AMP platform
Configuration Steps#
Before you can start using Crew Studio, you need to configure your LLM connections:
Go to the LLM Connections tab in your CrewAI AMP dashboard and create a new LLM connection.
Feel free to use any LLM provider you want that is supported by CrewAI.
Configure your LLM connection:
Enter a
Connection Name(e.g.,OpenAI)Select your model provider:
openaiorazureSelect models you’d like to use in your Studio-generated Crews
- We recommend at least
gpt-4o,o1-mini, andgpt-4o-mini
- We recommend at least
Add your API key as an environment variable:
- For OpenAI: Add
OPENAI_API_KEYwith your API key - For Azure OpenAI: Refer to this article for configuration details
- For OpenAI: Add
Click
Add Connectionto save your configuration<img src="https://mintcdn.com/crewai/Tp3HEbbp9mp-dy3H/images/enterprise/llm-connection-config.png?fit=max&auto=format&n=Tp3HEbbp9mp-dy3H&q=85&s=c06fcdb008733c7e1d6ec7fcd055ff2c" alt="LLM Connection Configuration" data-og-width="2526" width="2526" data-og-height="1794" height="1794" data-path="images/enterprise/llm-connection-config.png" data-optimize="true" data-opv="3" srcset="https://mintcdn.com/crewai/Tp3HEbbp9mp-dy3H/images/enterprise/llm-connection-config.png?w=280&fit=max&auto=format&n=Tp3HEbbp9mp-dy3H&q=85&s=929f529b52c50511a773f2ec0791cd9a 280w, https://mintcdn.com/crewai/Tp3HEbbp9mp-dy3H/images/enterprise/llm-connection-config.png?w=560&fit=max&auto=format&n=Tp3HEbbp9mp-dy3H&q=85&s=3f922308dfa3d65a392d5ebecec593dd 560w, https://mintcdn.com/crewai/Tp3HEbbp9mp-dy3H/images/enterprise/llm-connection-config.png?w=840&fit=max&auto=format&n=Tp3HEbbp9mp-dy3H&q=85&s=df92dce860921dac542382ca3882decb 840w, https://mintcdn.com/crewai/Tp3HEbbp9mp-dy3H/images/enterprise/llm-connection-config.png?w=1100&fit=max&auto=format&n=Tp3HEbbp9mp-dy3H&q=85&s=1772f4775c3f02e17d152bc00a08ba45 1100w, https://mintcdn.com/crewai/Tp3HEbbp9mp-dy3H/images/enterprise/llm-connection-config.png?w=1650&fit=max&auto=format&n=Tp3HEbbp9mp-dy3H&q=85&s=508cb4812120d6bc6b3010415f118a4a 1650w, https://mintcdn.com/crewai/Tp3HEbbp9mp-dy3H/images/enterprise/llm-connection-config.png?w=2500&fit=max&auto=format&n=Tp3HEbbp9mp-dy3H&q=85&s=2eb75a3247fbc61ab727978b8a6ce371 2500w" />Once you complete the setup, you’ll see your new connection added to the list of available connections.
<img src="https://mintcdn.com/crewai/5SZbe87tsCWZY09V/images/enterprise/connection-added.png?fit=max&auto=format&n=5SZbe87tsCWZY09V&q=85&s=3726ffaa33f0bfdf221dd542ae729f69" alt="Connection Added" data-og-width="1966" width="1966" data-og-height="532" height="532" data-path="images/enterprise/connection-added.png" data-optimize="true" data-opv="3" srcset="https://mintcdn.com/crewai/5SZbe87tsCWZY09V/images/enterprise/connection-added.png?w=280&fit=max&auto=format&n=5SZbe87tsCWZY09V&q=85&s=4acf6c926c288b5d32f9c537329b4611 280w, https://mintcdn.com/crewai/5SZbe87tsCWZY09V/images/enterprise/connection-added.png?w=560&fit=max&auto=format&n=5SZbe87tsCWZY09V&q=85&s=9bdfd3df0a3d3f3ba1d2f91472471ba0 560w, https://mintcdn.com/crewai/5SZbe87tsCWZY09V/images/enterprise/connection-added.png?w=840&fit=max&auto=format&n=5SZbe87tsCWZY09V&q=85&s=1658dc464f8869ad3f0eb0595faf4048 840w, https://mintcdn.com/crewai/5SZbe87tsCWZY09V/images/enterprise/connection-added.png?w=1100&fit=max&auto=format&n=5SZbe87tsCWZY09V&q=85&s=a0e1b1b559acc03bfbc3a40f17920e40 1100w, https://mintcdn.com/crewai/5SZbe87tsCWZY09V/images/enterprise/connection-added.png?w=1650&fit=max&auto=format&n=5SZbe87tsCWZY09V&q=85&s=837c27260c5c258d9da4c306e4d16ae0 1650w, https://mintcdn.com/crewai/5SZbe87tsCWZY09V/images/enterprise/connection-added.png?w=2500&fit=max&auto=format&n=5SZbe87tsCWZY09V&q=85&s=649700c55072c94135d7a44e07b5f0df 2500w" />In the main menu, go to Settings → Defaults and configure the LLM Defaults settings:
Select default models for agents and other components
Set default configurations for Crew Studio
Click Save Settings to apply your changes.
<img src="https://mintcdn.com/crewai/Tp3HEbbp9mp-dy3H/images/enterprise/llm-defaults.png?fit=max&auto=format&n=Tp3HEbbp9mp-dy3H&q=85&s=b773c2d7e8338e8dbf609ff45ce16eda" alt="LLM Defaults Configuration" data-og-width="2534" width="2534" data-og-height="1128" height="1128" data-path="images/enterprise/llm-defaults.png" data-optimize="true" data-opv="3" srcset="https://mintcdn.com/crewai/Tp3HEbbp9mp-dy3H/images/enterprise/llm-defaults.png?w=280&fit=max&auto=format&n=Tp3HEbbp9mp-dy3H&q=85&s=b08470ddaeb12d378083dff2e852934b 280w, https://mintcdn.com/crewai/Tp3HEbbp9mp-dy3H/images/enterprise/llm-defaults.png?w=560&fit=max&auto=format&n=Tp3HEbbp9mp-dy3H&q=85&s=e58e547acb63b13b01fdf52c1771d42d 560w, https://mintcdn.com/crewai/Tp3HEbbp9mp-dy3H/images/enterprise/llm-defaults.png?w=840&fit=max&auto=format&n=Tp3HEbbp9mp-dy3H&q=85&s=c9b45ef41f6b3068580a4085c5c914cf 840w, https://mintcdn.com/crewai/Tp3HEbbp9mp-dy3H/images/enterprise/llm-defaults.png?w=1100&fit=max&auto=format&n=Tp3HEbbp9mp-dy3H&q=85&s=4366e6bb2207f83d10b825a6e5393743 1100w, https://mintcdn.com/crewai/Tp3HEbbp9mp-dy3H/images/enterprise/llm-defaults.png?w=1650&fit=max&auto=format&n=Tp3HEbbp9mp-dy3H&q=85&s=1a48e293ccbcb1c990cfb0a56d386b32 1650w, https://mintcdn.com/crewai/Tp3HEbbp9mp-dy3H/images/enterprise/llm-defaults.png?w=2500&fit=max&auto=format&n=Tp3HEbbp9mp-dy3H&q=85&s=f11e748fbc1d3ef89abfef88b95ba9fb 2500w" />
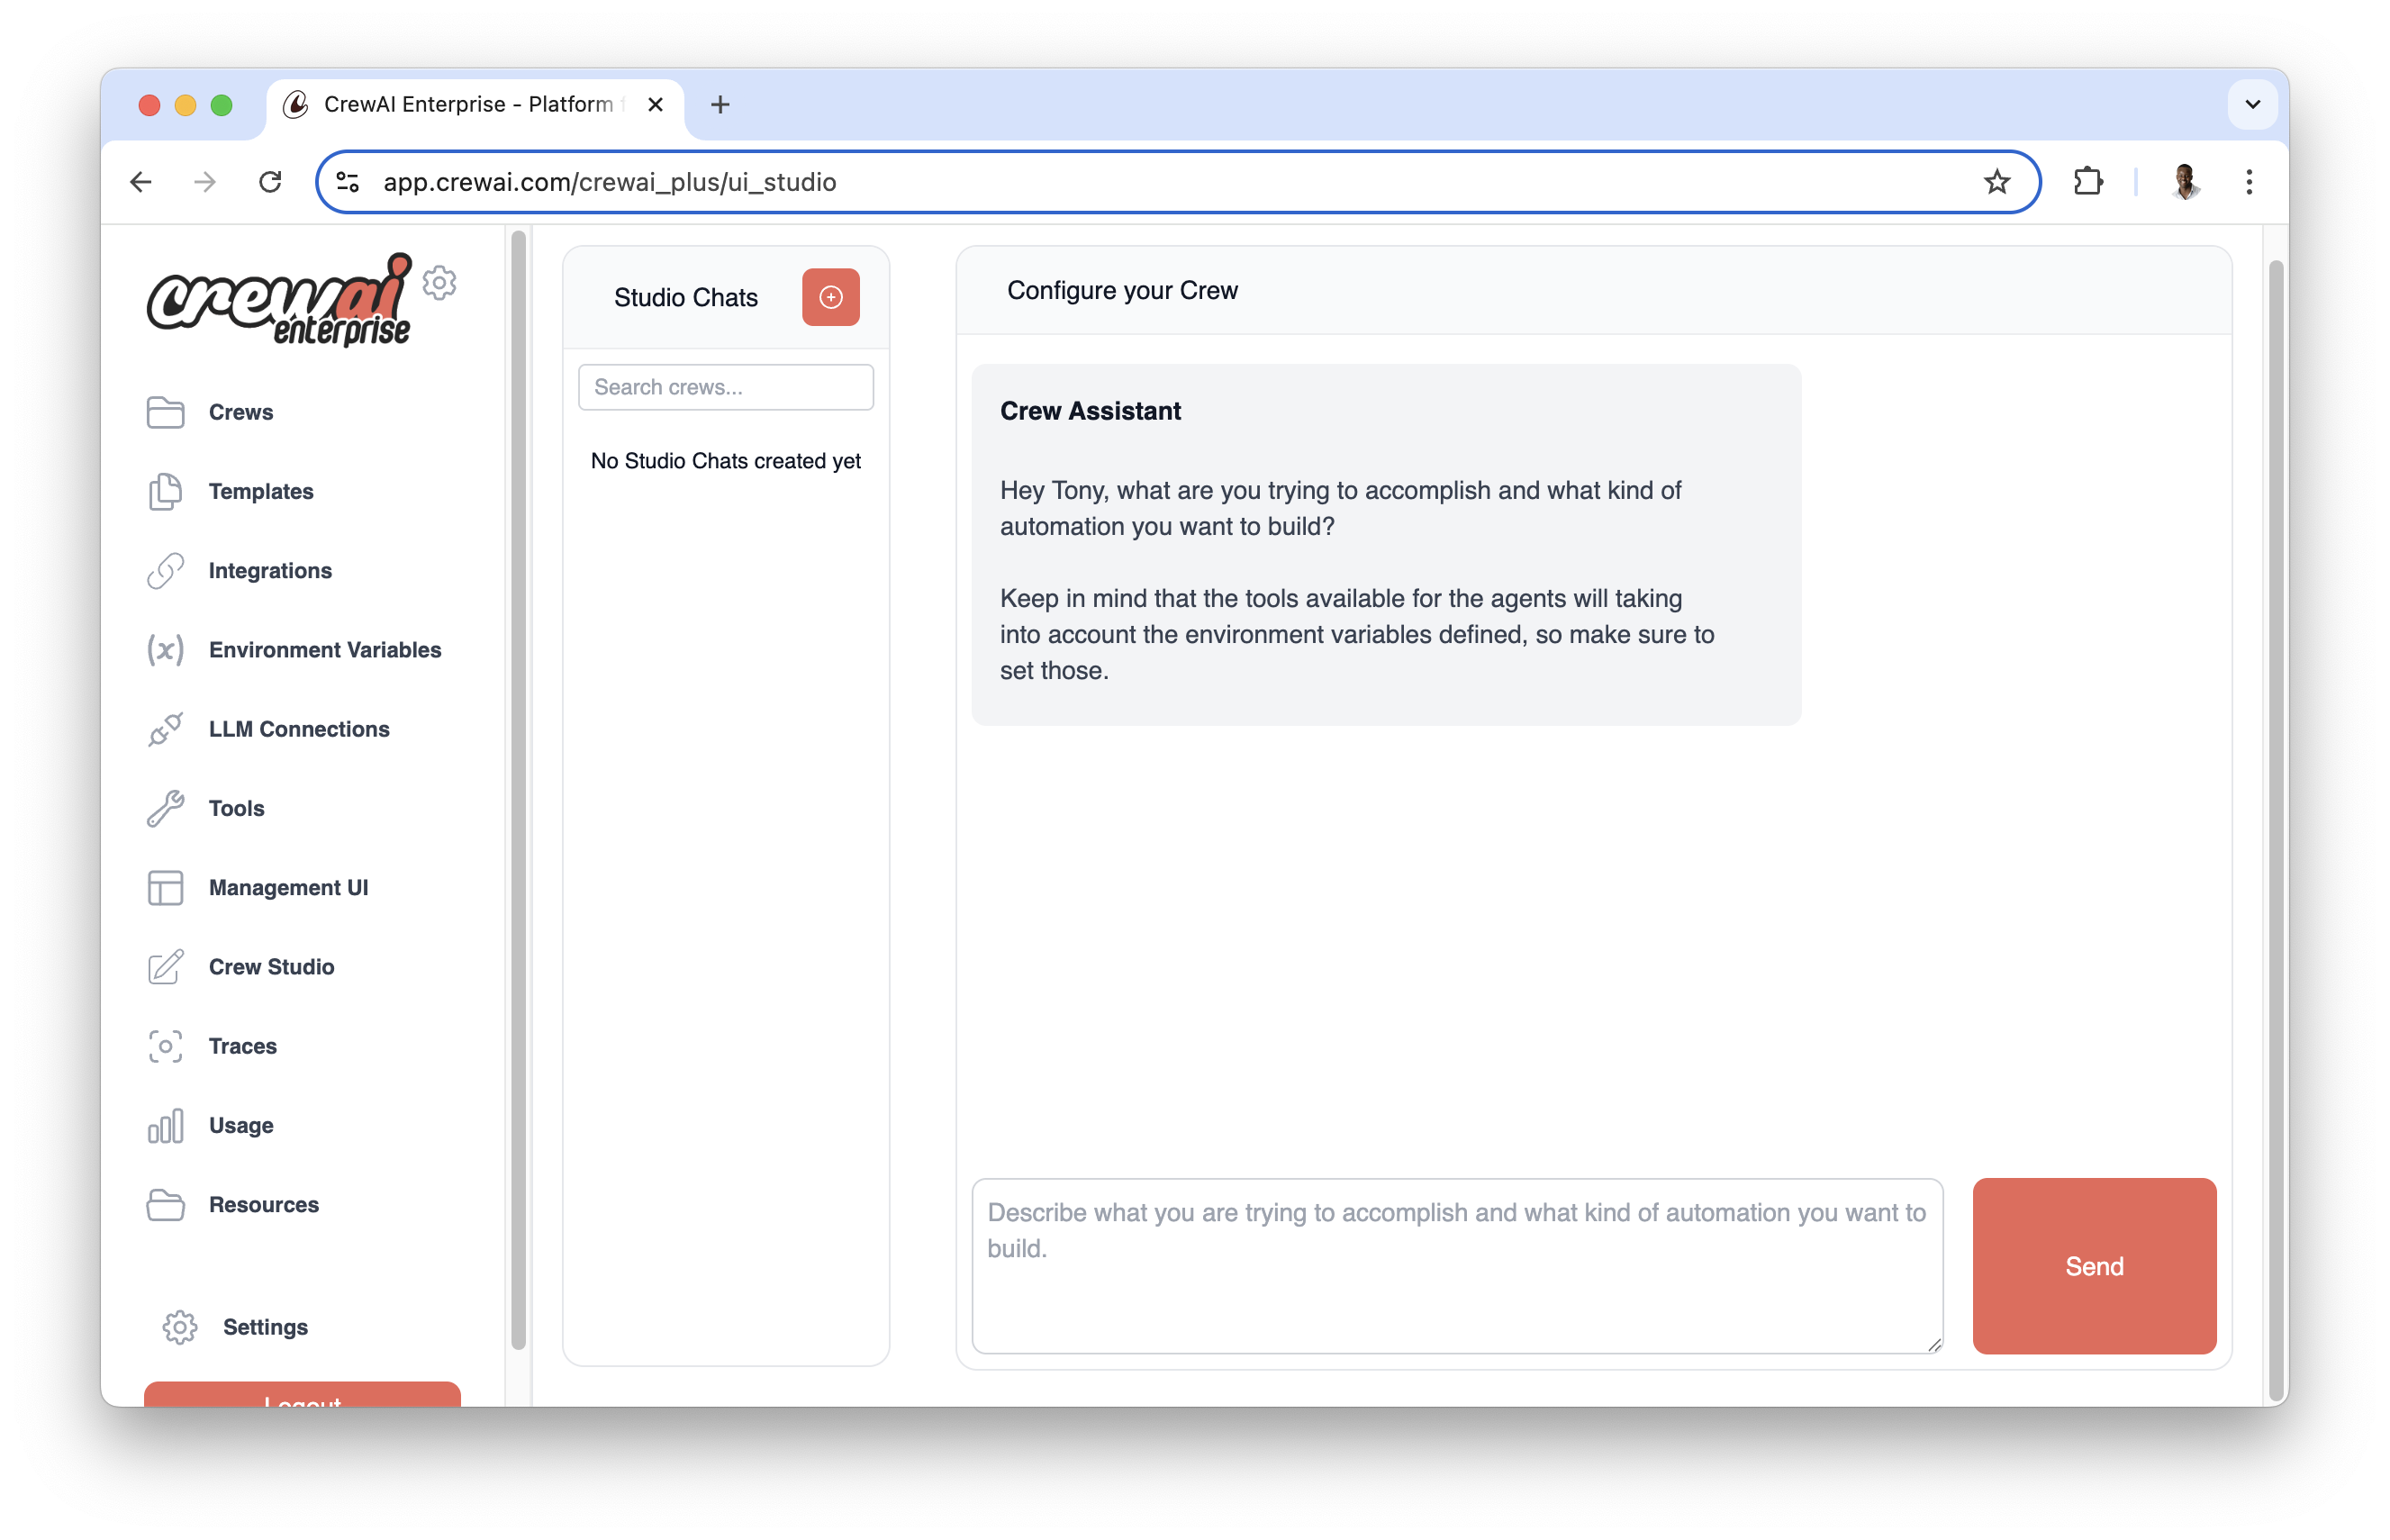
Using Crew Studio#
Now that you’ve configured your LLM connection and default settings, you’re ready to start using Crew Studio!
Navigate to the Studio section in your CrewAI AMP dashboard.
Start a conversation with the Crew Assistant by describing the problem you want to solve:
    I need a crew that can research the latest AI developments and create a summary report.
    ```

The Crew Assistant will ask clarifying questions to better understand your requirements.
  <span class="step-end"></span>

  <span class="step-marker" data-step-title="Review Generated Crew"></span>
Review the generated crew configuration, including:

* Agents and their roles
* Tasks to be performed
* Required inputs
* Tools to be used

This is your opportunity to refine the configuration before proceeding.
  <span class="step-end"></span>

  <span class="step-marker" data-step-title="Deploy or Download"></span>
Once you're satisfied with the configuration, you can:

* Download the generated code for local customization
* Deploy the crew directly to the CrewAI AMP platform
* Modify the configuration and regenerate the crew
  <span class="step-end"></span>

  <span class="step-marker" data-step-title="Test Your Crew"></span>
After deployment, test your crew with sample inputs to ensure it performs as expected.
  <span class="step-end"></span>
<span class="steps-end"></span>

<span class="callout-start" data-callout-type="tip"></span>
  For best results, provide clear, detailed descriptions of what you want your
  crew to accomplish. Include specific inputs and expected outputs in your
  description.
<span class="callout-end"></span>

## Example Workflow

Here's a typical workflow for creating a crew with Crew Studio:

<span class="steps-start"></span>
  <span class="step-marker" data-step-title="Describe Your Problem"></span>
Start by describing your problem:

```md
    I need a crew that can analyze financial news and provide investment recommendations
    ```
  <span class="step-end"></span>


  <span class="step-marker" data-step-title="Answer Questions"></span>
Respond to clarifying questions from the Crew Assistant to refine your
requirements.
  <span class="step-end"></span>

  <span class="step-marker" data-step-title="Review the Plan"></span>
Review the generated crew plan, which might include:

* A Research Agent to gather financial news
* An Analysis Agent to interpret the data
* A Recommendations Agent to provide investment advice
  <span class="step-end"></span>


  <span class="step-marker" data-step-title="Approve or Modify"></span>
Approve the plan or request changes if necessary.
  <span class="step-end"></span>


  <span class="step-marker" data-step-title="Download or Deploy"></span>
Download the code for customization or deploy directly to the platform.
  <span class="step-end"></span>

  <span class="step-marker" data-step-title="Test and Refine"></span>
Test your crew with sample inputs and refine as needed.
  <span class="step-end"></span>
<span class="steps-end"></span>

<span class="card-start" data-card-title="Need Help?" data-card-icon="headset" data-card-href="mailto:support@crewai.com"></span>
  Contact our support team for assistance with Crew Studio or any other CrewAI
  AMP features.
<span class="card-end"></span>