React Component Export ↗
noOriginal Documentation
Documentation Index#
Fetch the complete documentation index at: https://docs.crewai.com/llms.txt Use this file to discover all available pages before exploring further.
Learn how to export and integrate CrewAI AMP React components into your applications
This guide explains how to export CrewAI AMP crews as React components and integrate them into your own applications.
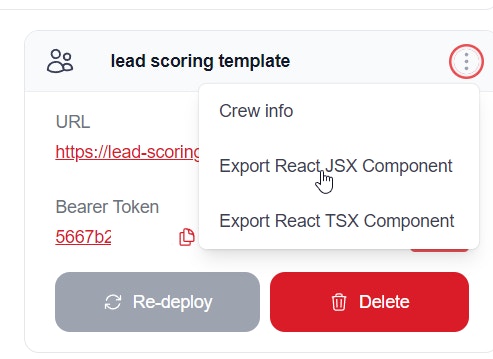
Exporting a React Component#
Click on the ellipsis (three dots on the right of your deployed crew) and select the export option and save the file locally. We will be using CrewLead.jsx for our example.
Setting Up Your React Environment#
To run this React component locally, you’ll need to set up a React development environment and integrate this component into a React project.
Download and install Node.js from the official website: https://nodejs.org/
Choose the LTS (Long Term Support) version for stability.
Open Command Prompt or PowerShell
Navigate to the directory where you want to create your project
Run the following command to create a new React project:
    npx create-react-app my-crew-app
    ```
Change into the project directory:
    cd my-crew-app
    ```
<span class="step-end"></span>

<span class="step-marker" data-step-title="Install necessary dependencies"></span>
    npm install react-dom
    ```
  <span class="step-end"></span>

  <span class="step-marker" data-step-title="Create the CrewLead component"></span>
* Move the downloaded file `CrewLead.jsx` into the `src` folder of your project,
  <span class="step-end"></span>

  <span class="step-marker" data-step-title="Modify your App.js to use the CrewLead component"></span>
* Open `src/App.js`
* Replace its contents with something like this:

```jsx
    import React from 'react';
    import CrewLead from './CrewLead';

    function App() {
        return (

                <CrewLead baseUrl="YOUR_API_BASE_URL" bearerToken="YOUR_BEARER_TOKEN" />

        );
    }

    export default App;
    ```

* Replace `YOUR_API_BASE_URL` and `YOUR_BEARER_TOKEN` with the actual values for your API.
  <span class="step-end"></span>

  <span class="step-marker" data-step-title="Start the development server"></span>
* In your project directory, run:

  ```bash
      npm start
      ```
* This will start the development server, and your default web browser should open automatically to [http://localhost:3000](http://localhost:3000), where you'll see your React app running.
  <span class="step-end"></span>
<span class="steps-end"></span>

## Customization

You can then customise the `CrewLead.jsx` to add color, title etc


  <img src="https://mintcdn.com/crewai/5SZbe87tsCWZY09V/images/enterprise/customise-react-component.png?fit=max&auto=format&n=5SZbe87tsCWZY09V&q=85&s=4673fd3ac9eedc1c83b777afb8cf09c9" alt="Customise React Component" data-og-width="1119" width="1119" data-og-height="939" height="939" data-path="images/enterprise/customise-react-component.png" data-optimize="true" data-opv="3" srcset="https://mintcdn.com/crewai/5SZbe87tsCWZY09V/images/enterprise/customise-react-component.png?w=280&fit=max&auto=format&n=5SZbe87tsCWZY09V&q=85&s=551606e5340b4eb48fa2ca617486ab17 280w, https://mintcdn.com/crewai/5SZbe87tsCWZY09V/images/enterprise/customise-react-component.png?w=560&fit=max&auto=format&n=5SZbe87tsCWZY09V&q=85&s=4861d2caa401af697527bbafe3cfdb8a 560w, https://mintcdn.com/crewai/5SZbe87tsCWZY09V/images/enterprise/customise-react-component.png?w=840&fit=max&auto=format&n=5SZbe87tsCWZY09V&q=85&s=ce6d2304d336e487c9bfbd8e1fde5eaf 840w, https://mintcdn.com/crewai/5SZbe87tsCWZY09V/images/enterprise/customise-react-component.png?w=1100&fit=max&auto=format&n=5SZbe87tsCWZY09V&q=85&s=1b2d7f443f10ff21f73e14ef42f91063 1100w, https://mintcdn.com/crewai/5SZbe87tsCWZY09V/images/enterprise/customise-react-component.png?w=1650&fit=max&auto=format&n=5SZbe87tsCWZY09V&q=85&s=af6ddc00aa79e8b1606d74b587336a5d 1650w, https://mintcdn.com/crewai/5SZbe87tsCWZY09V/images/enterprise/customise-react-component.png?w=2500&fit=max&auto=format&n=5SZbe87tsCWZY09V&q=85&s=997057d8f5ed2b15166ea3cec704a4f3 2500w" />


  <img src="https://mintcdn.com/crewai/5SZbe87tsCWZY09V/images/enterprise/customise-react-component-2.png?fit=max&auto=format&n=5SZbe87tsCWZY09V&q=85&s=714c15d129b3db4bd96cdc55e80916dd" alt="Customise React Component" data-og-width="1058" width="1058" data-og-height="427" height="427" data-path="images/enterprise/customise-react-component-2.png" data-optimize="true" data-opv="3" srcset="https://mintcdn.com/crewai/5SZbe87tsCWZY09V/images/enterprise/customise-react-component-2.png?w=280&fit=max&auto=format&n=5SZbe87tsCWZY09V&q=85&s=5c589ec079cd09f29551136ee607d0a5 280w, https://mintcdn.com/crewai/5SZbe87tsCWZY09V/images/enterprise/customise-react-component-2.png?w=560&fit=max&auto=format&n=5SZbe87tsCWZY09V&q=85&s=059851daaaf939d0a5bb2aa1598940cf 560w, https://mintcdn.com/crewai/5SZbe87tsCWZY09V/images/enterprise/customise-react-component-2.png?w=840&fit=max&auto=format&n=5SZbe87tsCWZY09V&q=85&s=3bad7a6f0f18aff57419ded53c398f15 840w, https://mintcdn.com/crewai/5SZbe87tsCWZY09V/images/enterprise/customise-react-component-2.png?w=1100&fit=max&auto=format&n=5SZbe87tsCWZY09V&q=85&s=6753c201e535c8fcebd1d949436003c7 1100w, https://mintcdn.com/crewai/5SZbe87tsCWZY09V/images/enterprise/customise-react-component-2.png?w=1650&fit=max&auto=format&n=5SZbe87tsCWZY09V&q=85&s=352df6d7283212880ef271a8fb673098 1650w, https://mintcdn.com/crewai/5SZbe87tsCWZY09V/images/enterprise/customise-react-component-2.png?w=2500&fit=max&auto=format&n=5SZbe87tsCWZY09V&q=85&s=725cfe8688b8135dd25290296d787dbf 2500w" />


## Next Steps

* Customize the component styling to match your application's design
* Add additional props for configuration
* Integrate with your application's state management
* Add error handling and loading states